Measuring a dog’s neck is not easy. So I have written a few notes which may help you. If having read them you are still not sure, ring me anyway and we’ll sort it out together.
How and where you measure your dog’s neck will depend on the type of collar you need and what it is to be used for, i.e. ‘showing in the ring’ or just normal day to day use.
Measuring for a non-adjustable round or flat leather half check collar
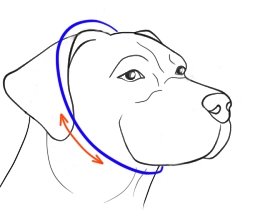
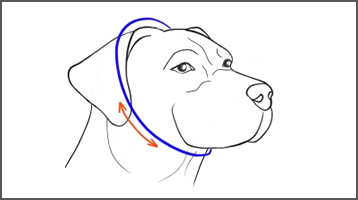
Measure under the chin and up behind the ears as shown below.
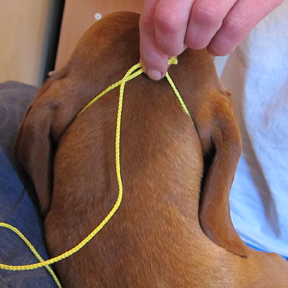 Either use a cloth type tape measure, or in the case of heavily coated breeds, a length of fine string. It is important to get the measurement around the actual skin of the neck, as this is where the leather part of the collar is going to sit. Do NOT place any fingers between the tape and the neck. This measurement should be as accurate as possible, as whatever you tell me it is, say 12”, will become the length of the leather part of the collar, given that the chain ‘opens’ up a further 4” to allow for the collar to go over the dog’s head and to provide the important ‘checking’ action when the dog is on the move.
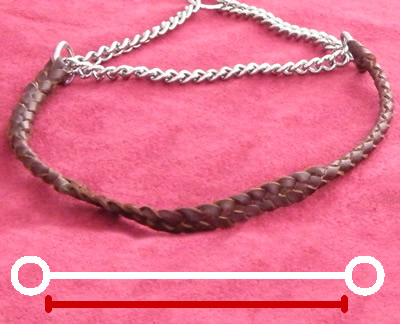
If you are basing the measurement on an existing round leather collar then please only measure the leather part of the collar, i.e. excluding the chain, if you don’t then what you get, may very well be too large.
If you need help with ordering your collar, do not hesitate to email me.
Measuring for aadjustable flat leather half check collar
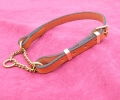 The same principle of how to measure, as outlined above, applies here too. However in this case the precise position of the hole placed at the 12” point, would be determined between us and be dependent on the age of the dog, and whether the breed is one with a short coat or a heavy one. For example if the 12” was for a very young puppy, then the first hole would be 12” away from the buckle spike, with subsequent holes punched to allow for growth.
If you are basing the measurement on an existing flat leather collar then please only measure the leather part of the collar, i.e. excluding the chain, if you don’t then what you get, may very well be too large
Measuring for a new buckle collar.
Again it is important to measure as close to the skin of the dog’s neck as possible, as described above. Using the example of 12”, then the precise position we place the 12” hole at would depend on the age of the dog and whether it is a breed subject to heavy moulting. For example if the 12” was for a very young puppy, then the first hole would be 12” away from the buckle spike, with subsequent holes punched to allow for growth.
If your dog already wears a buckle collar, lay it flat and (see below) measure from the spike in the buckle to the existing hole you are using. Then we have a guide from which we can make your new collar either bigger or smaller.

If you dog wears an adjustable collar with a clip as below, open it up, lay it flat, and measure from the end of the buckle to just where the fork of the male part of the buckle starts. Again we have a guide from which we can make your new collar either bigger or smaller.

American Collars
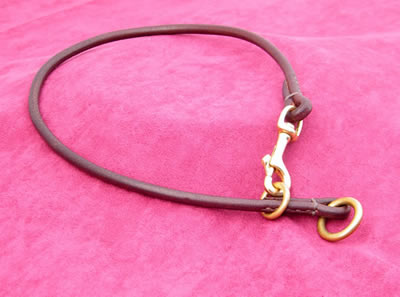 As you can see in the picture this type of Collar, much favoured by owners of Dobermanns who show their dogs, has a ring at one end and a Trigger Hook at the other.
Here again measure under the chin and up behind the ears as shown below.
Either use a cloth type tape measure, or in the case of heavily coated breeds, a length of fine string. It is important to get the measurement around the actual skin of the neck, as this is where the leather part of the collar is going to sit. Do NOT place any fingers between the tape and the neck.
This measurement should be as accurate as possible, as whatever you tell me it is, say 12”, will become the length from the Ring at one end to the furthest part of the Trigger Hook (the bit that opens).
The concept of an American Collar is that it should sit into the ridge on the top of the dogs neck which when fitted properly means the collar is less likely to slip down the neck when showing.
Measuring for a Slip Collar (Round or Flat Leather)
This is where you totally ignore all the methods described above!
The key measurement needed for Slip Collars is the widest part of the dog’s head, as shown a below.
The size of the dog’s neck is totally irrelevant, it is the head size we need to measure, as per the Blue line, to ensure the Slip Collar can fit over it. Most people then add 4” on, so in the 12″ example I have used, you would be ordering a 16” Slip Collar which would then fit comfortably over the dog’s head and have a ‘flying end’ of 4”, ending in the ring your lead clips onto.

